Sunday, May 28, 2006

Harmonious Dyad

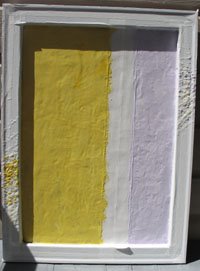
I made more progress this weekend and began the layers of wax which have colors. To the left I put one layer of naples yellow wax, one layer of mixed cadium yellow and titanium white waxes, and then a third layer of naples yellow wax again. You can't see it from the photo (which I took out in the sun, by the way, so that's just a shadow you see...), but up close you can now see hints of whisps of the cadium yellow and the titanium white.

Between each layer I took a razor blade and scraped back the wax until there a relatively smooth surface and then I fused that layer with the heat gun and then went on to the next layer. Encaustics are a pretty process-intensive art form.

To the right, I have a very pastel hue of violet. One layer of that, one layer of titanium white and a third layer of the violet again. Scraped smooth with a razor between each layer and each layer fused with the heat gun.

You can see more clearly now how the wax drips on the frame section and that is why painters tape on all of the black frame was a good preventative move.

The white column in the middle is not really white - it is actually also painters tape, just keeping the other colors from bleeding into that space, which is where I'll put a third color.

Got a blister on my right thumb from working the razor blade too intently...I might have to come up with another way to hold that thing. But I made enough progress for today.

Why is this post titled Harmonious Dyad? Because yellow and violet make up one of the complementary or harmonious "sets" of colors on the color wheel. I'm playing with very varied hues of those colors and it was really not my intent to pick a harmonious dyad, but it just came out that way. My next color on the piece will not form a harmonious tetrad, so we'll just have to see how it looks as it proceeds.

I was selected to serve on a criminal trial case this coming up week, so I don't expect to get back to doing art until that is over with. Civic duty and all...

Technorati tags: , , ,

Thursday, May 25, 2006

Homage to an Homage of a Chair

My friend Sue just completed a drawing class and I wanted to post her final project, so she may see it online. She needed to include 6 concepts that were covered in the course of the class. It was also the first time she incorporated color in her drawing work. She chose to do an homage to David Hockey's painting which was an homage to Vincent Van Gogh's painting.

Here is her final project (being held up to a wall by her and Peter so I could take a picture), her homage drawing to David Hockey's painting.


Here is David Hockey's painting that was an homage of Vincent Van Gogh's painting.


Here is Vincent Van Gogh's painting.


Technorati tags: , , ,

Sunday, May 21, 2006

15 Wax Layers

This weekend I completed 15 layers of the clear wax medium on the piece. You can see by the second photo that when the wax is still warm it has a milky look to it, but when it cools and hardens, it is a little more clear, but not completely clear as the layers get thicker and thicker.


A friend not familiar with encaustics asked me why I don't just pour all the wax in I need at one time. The piece is stronger (more resistant to cracks and chips) if each layer is painted on, fuse to the layer below with a heat source (a heat gun in my case) and each layer is patiently constructed. Painting the wax on is not the hard part... at this stage. The fusing takes a little bit of time (approximately 20 minutes for each layer).

I did all these initial layers of clear medium wax to build up the depth and thickness of the piece. My next stage will be to begin the layers of color-pigmented wax and begin the actual construction of the composition.

Technorati tags: , , ,

Saturday, May 13, 2006

First Wax Layers


Here is the painting with the painters tape on the framing (that was a good idea, you can see the textures on the side tapes which is dripped wax) and the first 5 thin layers of clear wax medium (pharmaceutical grade beeswax and damar).


You can barely see the wax on the wood at this stage, but in order to build a stronger piece, each layer should be thin and built up patiently, layer after layer.


I'll continue to add layers of clear medium until it gets pretty thick.


Technorati tags: , , ,

Friday, May 12, 2006

Pre-Framing My Next Encaustic

Here is a photo of how the first "support" looks (of the 6 pieces I cut wood for) before I begin to lay layers of encaustic wax on it.

Painted the "frame" black (acrylic paint), glued the thin plywood to the back with wood glue. Braced it and let it dry.

Now I only have to attach d-ring screws on the back (I like to do that before I paint with wax, then I don't have to mess with screwing things into the surface once the painting is complete) and on the front I will tape the black frame part with painters tape (to keep wax drippings off it).

I still have to see how difficult this will be to work with once I start the wax painting part, but so far I like the idea of how framed it looks before I even begin...and that I won't be adding anymore weight after the fact to put a frame around it. It's pretty much that the "frame" is doing double duty as the bracing for the thin plywood and the framing for the finished look.

It's an experiment but might work out great.

I'll try and post some work-in-progress stages of this particular piece as I go along.


Technorati tags: , , , ,

Tuesday, May 09, 2006

Wedges and Wood and Wax, Oh My

I am challenged in moving my explorations in encaustic wax painting to larger sizes. Partly it's a confidence issue as I improve my technique with hot wax and partly it's a storage issue of larger pieces that will have layers and layers of wax on the surface. They have to be stored a little more carefully than my oil paintings.

I know exactly what I want to do for my first two large encaustic paintings. I decided the way to leap in was to build a couple of my own wood supports to paint on. Saturday, I went to Home Depot with my friend Peter and bought two 4x8 foot sheets of thin plywood. We then cut (okay...*he* cut) the sheets into various sizes to fit some pre-made left-over stretcher bars I had been given by my friend Lisa. The stretcher bars actually have a side to them that has a molding look and is nicer than just a flat surface. So I decided to paint the front side (that has the molding) black and glue the plywood board (with wood glue) to the back side, giving it an already framed look. I will paint my encaustic wax painting on the plywood but inside the "frame" on the front side. In order to not get wax drippings on the painting "frame", I'll have to mask it off with painters tape, but it will be much lighter than adding an additional frame at the end. I guess I'll find out if all of this effort is worth it.

My first larger piece will be 27"x19" of the actual artwork space, but with the built-in "frame", it's 32x24". So it's a start. I finished painting the "frame" black last night (gesso'd it first). It needs another coat today. I'll glue tomorrow and keep it braced for a day and hopefully begin work on laying down the initial layers of wax this weekend.


Technorati tags: , , ,

Wednesday, May 03, 2006

A Satellite View of the Past

Want to kill precious hours in your day? I got off-track today playing with Google Earth. I decided to grab a pic of the street where I grew up in New Jersey. I haven't been back there in over 15 years so I started moving the map around to all the places I used to spend my time as a young person. New Jersey was much more rural when I was growing up...but our street is pretty much what it was...the surrounding area is what used to just be fields and trees and now is all housing developments, but I was still fascinated by how things look now, at least from the perspective of some satellite passing overhead.


The map wasn't too bad. The "square" for the GPS was just two houses off (my old house is actually two house above where the square with the address is on the map). Every house on the block has all kinds of stories attached to them, for who lived there at the time. You can look at a larger image of this same map here.

Then look up your friends...other family members (I really liked switching from an address in California to one in New Jersey - the satellite actually scans across the entire U.S. to refocus its view...very cool), then start picking exotic locales...you may never have to start to paint!

Technorati tags: , ,

Tuesday, May 02, 2006

Getting the Art Word Out

The LA Times offered up an article yesterday about a conference underwritten by American Express called the National Arts Marketing Project Conference. It brings art organizations and marketers together to discuss "things". The jist of it was that art organizations need to make better use of more advanced technologies (email, podcasts, streaming media, mobile phone technolgies), which doesn't really sound like new news to me, but perhaps it is to some. A selection of factoids shared were:

  • Newspapers are still the dominant source of information about arts events, but e-mail is becoming increasingly important.

  • About $30 billion was spent online in the 2005 holiday season, an increase of 30% over 2004.

  • The average age of online users is 49, but all age groups are users.

  • Sixty-five percent of users are women, and of them, 47% have postgraduate degrees.

  • Household incomes of those using the Internet average $75,000.


Technorati tags: , , ,

Monday, May 01, 2006

The Art of Getting By

... Jumping into the blog "thing" almost as an after-thought. I usually am on the leading edge of technical things. It took me a couple of years to finally take the blog leap - but here I am. My blog will cover all things in my life art related and hopefully there will be something somewhere in my blog here and there that will catch someone's interest.

Thanks for stopping by and visiting!

Technorati tags: , ,